This Jack-o’-lantern cheese ball has become my go-to party trick every October, and honestly, it never fails to make people smile before they’ve even taken their first bite. There’s something magical about watching guests discover that underneath all those crunchy nacho chip “scales” lies the creamiest, most perfectly seasoned cheese mixture that somehow manages to taste even better than it looks. The combination of sharp cheddar tang, creamy base, and that subtle Worcestershire depth creates a flavor that’s sophisticated enough for adults but playful enough that kids beg to help with the decorating.
Key Takeaways
- The jack o lantern cheese ball is a fun and easy Halloween treat created using common ingredients.
- You need cream cheese, cheddar, scallions, and tortilla chips to make this festive cheese ball.
- Follow five simple steps: mix the cheese, shape and chill, coat in chips, create a face with olives, and add a pickle stem.
- You can make the cheese ball a day ahead for better flavor, and it can stay fresh in the fridge for three days.
- Variations include spicy, smoky, herb-infused, or mini versions for different tastes and dietary needs.
Estimated reading time: 7 minutes
Table of contents
Easy Jack-o'-lantern Cheese Ball Recipe
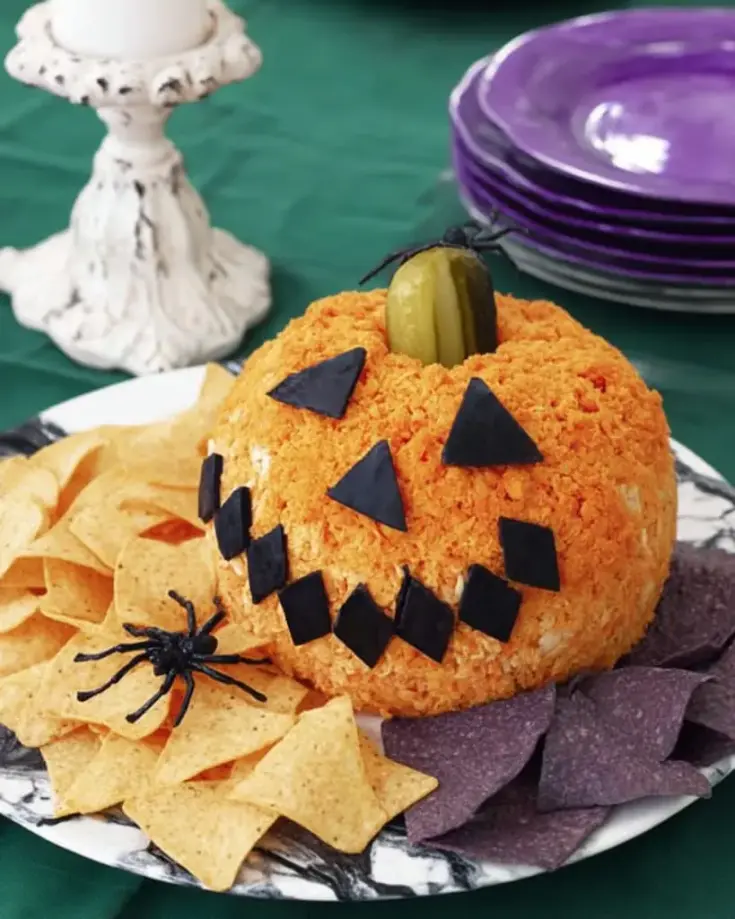
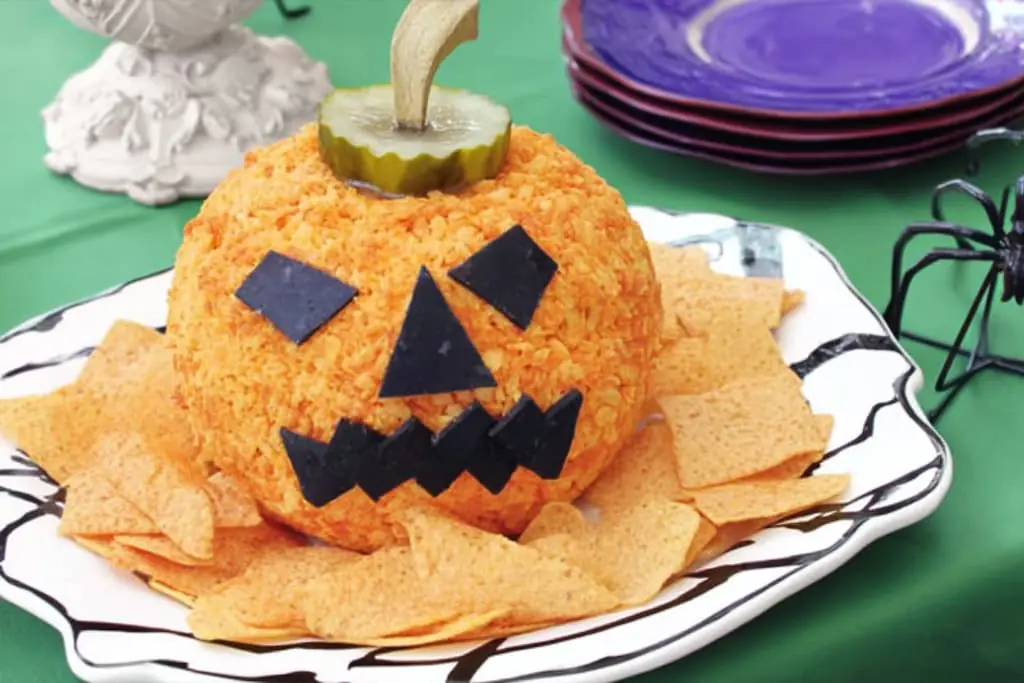
Festive Halloween cheese ball with creamy cheese mixture and crunchy tortilla chip coating, shaped like a jack-o'-lantern.
Ingredients
- 2 packages cream cheese (8 oz each), slightly softened
- 2 ounces sharp Cheddar cheese, grated (about 3/4 cup)
- 3 scallions, chopped
- 2 teaspoons Worcestershire sauce
- 1/2 cup finely crushed nacho cheese tortilla chips
- 4 large pitted black olives
- 1 small dill pickle
Instructions
- Mix softened cream cheese, grated Cheddar, chopped scallions, and Worcestershire sauce in a bowl until well combined.
- Shape mixture into a ball and gently flatten the top to create pumpkin shape. Make small indentation on top for stem.
- Wrap in plastic wrap and freeze for at least 1 hour until firm.
- Roll chilled cheese ball in crushed tortilla chips, pressing gently to adhere. Place on serving plate.
- Cut 2 olives into triangles for eyes and 2 olives into squares for mouth and teeth. Attach with toothpicks.
- Cut pickle in half and place one half on top as stem.
Notes
- Make ahead: Cheese ball can be shaped and chilled up to 2 days before serving.
- For extra flavor, add 1/4 teaspoon garlic powder to cheese mixture.
- If chips won't stick, lightly brush cheese ball with water first.
Nutrition Information:
Yield:
8Serving Size:
1Amount Per Serving: Calories: 183Total Fat: 14gSaturated Fat: 6gTrans Fat: 0gUnsaturated Fat: 6gCholesterol: 28mgSodium: 279mgCarbohydrates: 11gFiber: 1gSugar: 2gProtein: 4g
Nutrition info is meant as a rough guide. Brand choices, portion size, and swaps can shift the numbers, so double-check if exact values matter to you. See our full disclaimer at victoriarecipes.com/disclaimer for more details.
What You’ll Need
This festive appetizer comes together with just a handful of ingredients, most of which you probably already have:
- 2 packages cream cheese (8 oz each) – slightly softened (about 30 minutes at room temperature)
- 2 oz sharp Cheddar cheese, grated – about 3/4 cup, freshly grated tastes best
- 3 scallions, chopped – both white and green parts
- 2 teaspoons Worcestershire sauce – the secret ingredient for depth
- 1/2 cup finely crushed nacho cheese tortilla chips – from about 2.1 oz bag
- 4 large pitted black olives – for the face details
- 1 small dill pickle – for the stem (half a pickle is perfect)
- Toothpicks – for attaching facial features
Detailed Cooking Instructions

Time needed: 1 hour and 20 minutes
Create a festive jack-o’-lantern cheese ball with cream cheese mixture, tortilla chip coating, and olive decorations.
- Make cheese mixture
Mix softened cream cheese, grated Cheddar, chopped scallions, and Worcestershire sauce until completely combined and smooth.
- Shape and chill
Form mixture into a ball, flatten top slightly for pumpkin shape, and create small indentation for stem. Wrap and freeze 1 hour until firm.
- Coat with chips
Roll chilled cheese ball in crushed tortilla chips, pressing gently to ensure chips adhere completely.
- Create face
Cut olives into triangles for eyes and squares for mouth. Attach with toothpicks. Top with pickle half for stem.
Tips & Tricks
- Make it ahead: Shape the cheese ball up to 2 days before your party, then add the chip coating and decorations the day of serving for the crunchiest texture.
- Chip coating secret: If the chips won’t stick well, lightly brush the cheese ball with water first, then roll in chips and press gently but firmly.
- Perfect consistency: Let cream cheese sit at room temperature for exactly 30 minutes before mixing—too soft and it won’t hold its shape, too firm and it won’t blend smoothly.
- Creative variations: Try everything bagel seasoning mixed into the chips for an adult twist, or crush orange cheddar crackers instead for more authentic pumpkin color.
- Serving strategy: Place on a platter with sturdy crackers and small spreading knives, and watch guests fight over who gets the olive “eyes” first.
- Perfect pairing: Serve alongside my Victoria’s salsa recipe for guests who want something fresh and zesty to balance all that creamy richness—the combination is absolutely magical.
- Party safety tip: The Partnership for Food Safety Education reminds hosts that perishable Halloween appetizers should be kept chilled until serving time and shouldn’t sit out for more than 2 hours at room temperature.
You Might Also Like
If you’re planning a full Halloween spread, don’t miss my turkey chili recipe—it’s the perfect warming main dish to serve alongside this festive appetizer when the October weather turns chilly.
- Crispy Fried Catfish Recipe
- Delicious Keto Crackers 2 Ingredients to Love!
- Adorable Ghost Cupcakes for Halloween
- Easy Mummy Hot Dogs Recipe
- Gothic Halloween Cake
Frequently Asked Questions
Absolutely! The cheese ball is delicious on its own—just roll it in the crushed chips and serve. You can also try rolling it in chopped nuts or herbs instead.
It will stay fresh in the refrigerator for up to 4 days when wrapped tightly. For best texture, add the chip coating within 24 hours of serving.
Try soy sauce mixed with a pinch of garlic powder, or a splash of balsamic vinegar. The goal is to add umami depth to balance the rich cheese.
Yes, but freeze it before adding the chip coating and decorations. Thaw completely in the fridge, then add chips and olive features before serving.
Variations & Add-Ins
- Spicy version: Add 1/4 teaspoon cayenne pepper and a diced jalapeño to the cheese mixture, then roll in crushed spicy nacho chips.
- Herb lover’s twist: Mix in 2 tablespoons fresh chives and 1 tablespoon fresh dill, then coat with crushed herb-flavored crackers instead of chips.
- Smoky bacon upgrade: Fold in 1/3 cup crispy bacon bits and use BBQ-flavored chips for the coating—adults go wild for this version.
- Lower-fat option: Use light cream cheese and reduce the cheddar to 1/2 cup, then add an extra tablespoon of Worcestershire for flavor depth.
- Gluten-free alternative: Replace tortilla chips with crushed rice crackers or finely chopped toasted nuts for the same satisfying crunch.
- Gourmet finishing touch: Just before serving, try sprinkling the edges with my blue salt trick recipe for an unexpected pop of color and elevated flavor that’ll have your guests asking “how did you DO that?”
Dietary Notes
| Diet | Friendly? | Adjustments |
|---|---|---|
| Gluten-Free | No | Use gluten-free tortilla chips or crushed rice crackers |
| Dairy-Free | No | Substitute with dairy-free cream cheese and nutritional yeast |
| Vegan | No | Use vegan cream cheese, skip Worcestershire (contains anchovies) |
| Keto | Yes | Skip chips, roll in crushed pork rinds or chopped nuts instead |
| Nut-Free | Yes | Recipe is naturally nut-free as written |
Storage, Freezing & Reheating
- Fridge: Keeps 3-4 days wrapped tightly in plastic wrap, but add chip coating within 24 hours of serving for best crunch.
- Freezer: Freeze the plain cheese ball (before coating) up to 1 month wrapped in plastic then foil—perfect for make-ahead entertaining.
- Thawing: Move from freezer to fridge overnight for even texture, then let sit 15 minutes at room temperature before decorating.
- Serving temp: Serve at room temperature for easiest spreading—remove from fridge 20-30 minutes before guests arrive.
- Leftover magic: Spread any remaining cheese ball on bagels or use as a sandwich filling—it’s surprisingly good for breakfast!
- Food safety reminder: According to the USDA’s food safety guidelines, cream cheese products should never sit at room temperature for more than 2 hours to prevent harmful bacteria growth.
Save This Recipe for Later
Planning your Halloween party menu? Save this recipe to your Pinterest board and share it with friends who love creative appetizers that actually taste as good as they look.
Pin it here