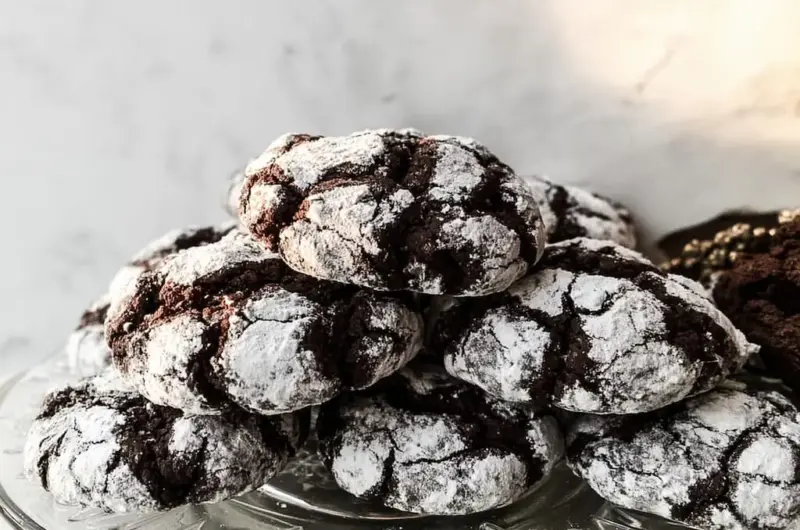
There’s something magical about watching chocolate crinkle cookies transform in the oven—those dark, fudgy dough balls crack open to reveal gorgeous white-dusted fissures that look almost too pretty to eat. I’ve been making these soft, chewy chocolate crinkle cookies for years, and they never fail to disappear within hours of cooling. The secret is that long chill time (I know, the waiting is hard!) which gives you that dramatic crackle effect and intensely rich chocolate flavor that makes these cookies absolutely irresistible.
If you’re curious about how ingredients affect cookie texture, the Institute of Culinary Education breaks down cookie science beautifully – including why the order you mix ingredients matters and how different sugars create chewy versus crispy textures.
Key Takeaways
- These Spider Chocolate Crinkle Cookies combine soft, fudgy chocolate crinkle cookies with fun spider decorations, making them perfect for Halloween.
- Chilling the dough for at least 4 hours is crucial, as it creates signature cracks and improves texture.
- The recipe uses simple pantry staples like unsweetened cocoa powder, ensuring rich flavor without excess sugar until the coating.
- You can easily modify the recipe for variations like peppermint chocolate crinkles or gluten-free options.
- Store baked cookies at room temperature for up to 5 days, and check out tips for freezing and reheating for freshness.
Estimated reading time: 9 minutes
Table of contents
Spider Chocolate Crinkle Cookies
Soft, fudgy chocolate crinkle cookies with dramatic powdered sugar cracks. These rich chocolate cookies feature an intense cocoa flavor and chewy texture that's perfect for holidays or everyday treats.
Ingredients
- 1 cup unsweetened cocoa powder
- 2 cups granulated sugar
- 1/2 cup vegetable oil
- 4 large eggs
- 2 teaspoons vanilla extract
- 2 cups all-purpose flour
- 2 teaspoons baking powder
- 1 teaspoon salt
- 1 cup confectioner's sugar (for coating)
Instructions
- Mix cocoa powder, granulated sugar, and vegetable oil in a medium bowl until dark and rich.
- Beat in eggs and vanilla extract until the mixture becomes smooth and glossy.
- Whisk together flour, baking powder, and salt in a separate bowl.
- Stir the flour mixture into the cocoa mixture just until combined.
- Cover dough with plastic wrap and refrigerate for at least 4 hours or overnight.
- Preheat oven to 350°F and line baking sheets with parchment paper.
- Roll chilled dough into 2-inch balls.
- Coat each ball completely in powdered sugar until totally white.
- Place dough balls on prepared sheets, spacing 2 inches apart (about 12 per sheet).
- Bake for 12-14 minutes until edges are set but centers remain soft.
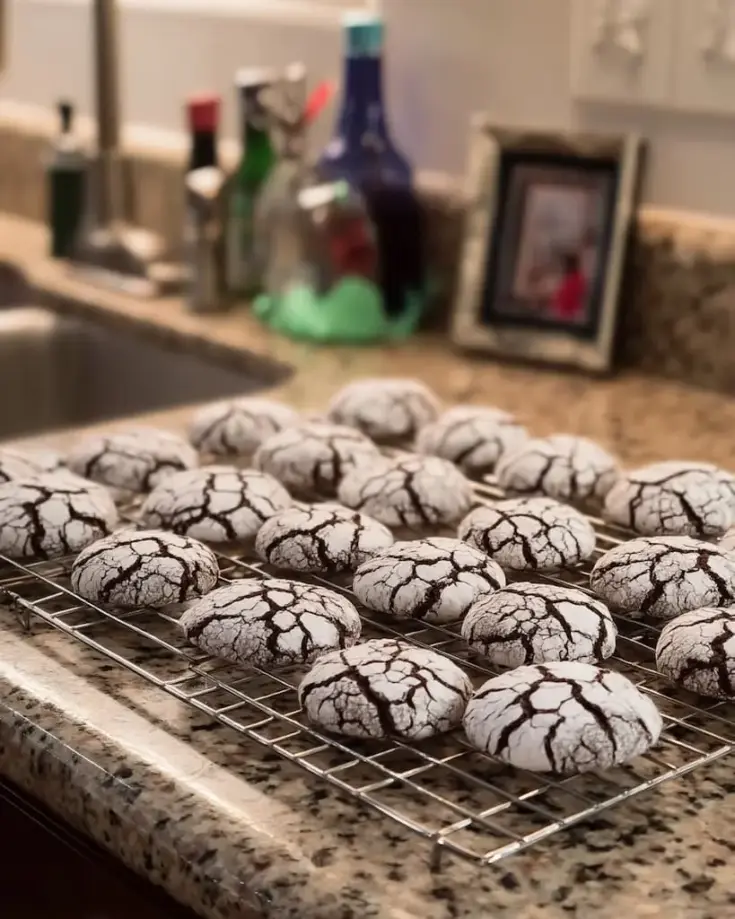
- Cool on baking sheet for 5 minutes, then transfer to wire rack.
Notes
- The 4-hour chill is essential for proper cracking—overnight works even better.
- Use good quality cocoa powder for the richest chocolate flavor.
- Don't overbake—cookies should look slightly underdone when you remove them.
- Store in an airtight container at room temperature for up to 5 days.
- For smaller cookies, roll into 1-inch balls and bake for 10-11 minutes.
Nutrition Information:
Yield:
36Serving Size:
1Amount Per Serving: Calories: 125Total Fat: 4gSaturated Fat: 1gTrans Fat: 0gUnsaturated Fat: 3gCholesterol: 21mgSodium: 94mgCarbohydrates: 21gFiber: 1gSugar: 14gProtein: 2g
Nutrition info is meant as a rough guide. Brand choices, portion size, and swaps can shift the numbers, so double-check if exact values matter to you. See our full disclaimer at victoriarecipes.com/disclaimer for more details.
What You’ll Need
These chocolate crinkle cookies come together with pantry staples you probably already have. The key is good quality cocoa powder—it makes all the difference in that deep chocolate flavor.
- 1 cup unsweetened cocoa powder (use Dutch-process for extra richness)
- 2 cups granulated sugar
- 1/2 cup vegetable oil (or canola oil)
- 4 large eggs (at room temperature)
- 2 teaspoons vanilla extract
- 2 cups all-purpose flour
- 2 teaspoons baking powder
- 1 teaspoon salt
- About 1 cup confectioner’s sugar (for coating—you might need more)
- Stand mixer or hand mixer (optional but helpful)
- Cookie sheets with parchment paper
- Wire cooling rack
Detailed Cooking Instructions

Time needed: 4 hours and 32 minutes
Rich, fudgy chocolate cookies with dramatic powdered sugar cracks, made with cocoa powder and chilled overnight for the best crinkle effect.
- Mix the wet chocolate base
In a medium bowl, combine cocoa powder, granulated sugar, and vegetable oil until the mixture looks rich and dark. Next, beat in the eggs and vanilla extract, mixing until everything becomes smooth and glossy. A stand mixer on low speed works beautifully here for that perfect shiny texture.
- Combine dry ingredients
In a separate bowl, whisk together the flour, baking powder, and salt until evenly distributed. Then, stir this flour mixture into the cocoa mixture with a wooden spoon just until combined—don’t overmix. The dough will be thick and sticky.
- Chill the dough
Cover the dough completely with plastic wrap and refrigerate for at least 4 hours. However, overnight chilling produces even better cracking and deeper flavor. This step is essential—don’t skip it or your cookies won’t crinkle properly.
- Prepare for baking
When you’re ready to bake, preheat your oven to 350°F. Line cookie sheets with parchment paper—I recommend preparing one sheet at a time so the dough doesn’t sit out too long. Place the powdered sugar in a medium bowl for easy coating.
- Shape and coat cookies
Roll the chilled dough into 2-inch balls (about 2 tablespoons each). Drop each ball into the powdered sugar bowl and swirl until completely coated—they should look totally white with no dark spots showing through. This generous coating creates those dramatic cracks.
- Bake until crackled
Place sugar-coated dough balls on prepared sheets, spacing them about 2 inches apart—you’ll fit roughly 12 per standard sheet. Bake for 12-14 minutes for 2-inch cookies. They’re done when the edges look set but the centers still appear slightly underdone. The cookies will firm up as they cool.
- Cool and serve
Let cookies cool on the baking sheet for at least 5 minutes before transferring to a wire rack. This cooling period is important—moving them too soon can cause breaking. Finally, enjoy them slightly warm with cold milk for the ultimate chocolate crinkle cookie experience.
Tips & Tricks
- Chill overnight for best results: The longer chill time not only helps the dough hold its shape, but also intensifies the chocolate flavor and creates more dramatic cracks. Plan to make the dough the night before you want to bake.
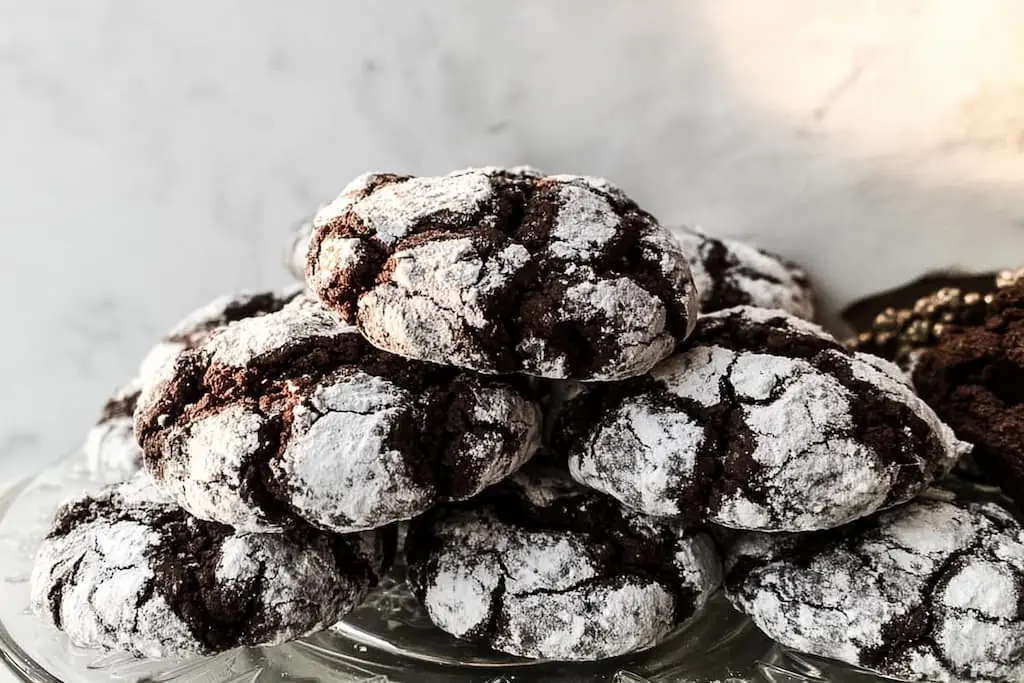
- Coat generously in powdered sugar: Don’t be shy with the coating—roll each dough ball until it’s completely white. This creates those beautiful spider-web cracks that give these cookies their signature look.
- Don’t overbake: These chocolate crinkle cookies should look slightly underdone when you pull them from the oven. They’ll continue cooking on the hot pan and firm up as they cool, staying wonderfully chewy in the center.
- Make ahead and freeze: Roll the dough balls, coat them in sugar, and freeze on a baking sheet. Once frozen solid, transfer to a freezer bag for up to 3 months. Bake straight from frozen, adding 1-2 extra minutes to the baking time.
- Swap in espresso powder: Add 1 tablespoon of instant espresso powder to the cocoa mixture to deepen the chocolate flavor without making the cookies taste like coffee. This little trick makes the chocolate taste even more intense.
- Love chocolate cookies? Try my Chocolate Brownie Cookies for a similar fudgy texture with crispy edges, or go all-in with S’mores Brownies when you want something even richer.
- Want to understand the science behind those gorgeous cracks? King Arthur Baking explains how crinkle cookies work – their test kitchen experts reveal why chilling the dough is non-negotiable and how the powdered sugar coating creates those dramatic fissures as the cookies puff in the oven.
You Might Also Like
If you love these chocolate crinkle cookies, you’ll also want to try my Chocolate Brownie Cookies—they have that same fudgy center but with crispy edges that are absolutely addictive. For something even more decadent, my S’mores Brownies combine all your favorite campfire flavors in one gooey, chocolatey bite. And if you’re planning a special occasion, the Gothic Halloween Red Velvet Cake is a stunning showstopper that’s easier to make than it looks.
- Chocolate Brownie Cookies Recipe
- Delicious Homemade Oatmeal Cream Pies Recipe
- Gothic Halloween Cake
- Decadent White Chocolate Raspberry Poke Cake
- Healthy Protein Muffins
Frequently Asked Questions
The secret to perfect chocolate crinkle cookies is chilling the dough for at least 4 hours (or overnight) before baking. This firm dough holds its shape better, allowing the powdered sugar coating to crack dramatically as the cookies expand in the oven. Additionally, coating the dough balls generously in powdered sugar creates those gorgeous spider-web fissures.
Yes, chocolate crinkle cookies should have a slightly gooey, fudgy center when fresh from the oven. They’ll look a bit underdone in the middle when you remove them, but they firm up as they cool while maintaining that wonderful chewy texture. Overbaking will make them dry rather than soft and rich.
Absolutely—refrigerating the dough for at least 4 hours is essential for chocolate crinkle cookies. The cold dough doesn’t spread as quickly in the oven, which allows the powdered sugar coating to crack open beautifully. Skipping this step results in flat cookies without those signature crackles.
You can make lemon crinkle cookies by replacing the cocoa powder with lemon zest and juice, or try peppermint chocolate crinkles by adding peppermint extract. For a festive twist, use red velvet cake mix or add cinnamon and cayenne for Mexican hot chocolate crinkles. Each variation follows the same chilling and coating technique.
Variations & Add-Ins
- Peppermint chocolate crinkles: Add 1/2 teaspoon peppermint extract along with the vanilla for a festive holiday twist. You can also fold in 1/2 cup crushed candy canes for extra minty crunch.
- Double chocolate version: Stir 1 cup of chocolate chips into the dough after mixing in the flour for an even richer chocolate experience. Dark chocolate chips work especially well with the cocoa base.
- Gluten-free option: Replace the all-purpose flour with a 1:1 gluten-free baking flour blend. The texture stays wonderfully chewy, though you might need to chill the dough slightly longer.
- Espresso chocolate crinkles: Mix 2 tablespoons instant espresso powder with the cocoa for a sophisticated mocha flavor that adults particularly love. This makes the chocolate taste more complex without tasting like coffee.
- Vegan adaptation: Use flax eggs (4 tablespoons ground flaxseed mixed with 10 tablespoons water, let sit 5 minutes) instead of regular eggs. The texture will be slightly denser but still delicious.
Dietary Notes
| Diet | Friendly? | Adjustments |
|---|---|---|
| Gluten-Free | Yes, with swap | Use 1:1 gluten-free flour blend in place of all-purpose flour |
| Dairy-Free | Yes | Already dairy-free as written—uses oil instead of butter |
| Vegan | Yes, with swap | Replace eggs with flax eggs (1 tablespoon ground flaxseed + 2.5 tablespoons water per egg) |
| Keto | No | Not keto-friendly due to sugar and flour content |
| Nut-Free | Yes | No nuts in recipe—safe for nut allergies |
Storage, Freezing & Reheating
- Fridge: Store baked chocolate crinkle cookies in an airtight container at room temperature for up to 5 days. They’ll stay soft and chewy if properly sealed—don’t refrigerate them or they’ll dry out.
- Freezer: Freeze baked cookies in freezer-safe containers with parchment paper between layers for up to 3 months. Alternatively, freeze unbaked sugar-coated dough balls on a baking sheet, then transfer to freezer bags once solid.
- Thawing: Baked cookies thaw at room temperature in about 30 minutes. For frozen dough balls, bake directly from frozen, adding 1-2 extra minutes to the baking time—no thawing needed.
- Reheat: Warm baked cookies in a 300°F oven for 3-5 minutes to restore that just-baked softness. Alternatively, microwave individual cookies for 10-15 seconds to make the centers gooey again.
- Make-ahead tip: Prepare the dough up to 3 days in advance and keep it covered in the fridge. When ready to bake, simply shape, coat in sugar, and pop in the oven for fresh chocolate crinkle cookies anytime.
Save This Recipe for Later
Love these chocolate crinkle cookies? Save this recipe to your Pinterest board so you can find it whenever that chocolate craving hits.
Pin it here